The following warnings occurred:
Warning [2] Undefined array key "fragment" - Line: 1494 - File: inc/class_parser.php PHP 8.1.32 (Linux)
File Line Function
/inc/class_error.php 153 errorHandler->error
/inc/class_parser.php 1494 errorHandler->error_callback
/inc/class_parser.php 1640 postParser->mycode_parse_video
[PHP] postParser->mycode_parse_video_callback
/inc/class_parser.php 513 preg_replace_callback
/inc/class_parser.php 228 postParser->parse_mycode
/portal.php 664 postParser->parse_message
Warning [2] Undefined array key "query" - Line: 1505 - File: inc/class_parser.php PHP 8.1.32 (Linux)
File Line Function
/inc/class_error.php 153 errorHandler->error
/inc/class_parser.php 1505 errorHandler->error_callback
/inc/class_parser.php 1640 postParser->mycode_parse_video
[PHP] postParser->mycode_parse_video_callback
/inc/class_parser.php 513 preg_replace_callback
/inc/class_parser.php 228 postParser->parse_mycode
/portal.php 664 postParser->parse_message
Warning [2] Undefined array key 1 - Line: 1510 - File: inc/class_parser.php PHP 8.1.32 (Linux)
File Line Function
/inc/class_error.php 153 errorHandler->error
/inc/class_parser.php 1510 errorHandler->error_callback
/inc/class_parser.php 1640 postParser->mycode_parse_video
[PHP] postParser->mycode_parse_video_callback
/inc/class_parser.php 513 preg_replace_callback
/inc/class_parser.php 228 postParser->parse_mycode
/portal.php 664 postParser->parse_message
Warning [2] Undefined array key 0 - Line: 1587 - File: inc/class_parser.php PHP 8.1.32 (Linux)
File Line Function
/inc/class_error.php 153 errorHandler->error
/inc/class_parser.php 1587 errorHandler->error_callback
/inc/class_parser.php 1640 postParser->mycode_parse_video
[PHP] postParser->mycode_parse_video_callback
/inc/class_parser.php 513 preg_replace_callback
/inc/class_parser.php 228 postParser->parse_mycode
/portal.php 664 postParser->parse_message
Warning [2] Undefined array key "v" - Line: 1591 - File: inc/class_parser.php PHP 8.1.32 (Linux)
File Line Function
/inc/class_error.php 153 errorHandler->error
/inc/class_parser.php 1591 errorHandler->error_callback
/inc/class_parser.php 1640 postParser->mycode_parse_video
[PHP] postParser->mycode_parse_video_callback
/inc/class_parser.php 513 preg_replace_callback
/inc/class_parser.php 228 postParser->parse_mycode
/portal.php 664 postParser->parse_message
Warning [2] Undefined variable $tcount - Line: 717 - File: portal.php PHP 8.1.32 (Linux)
File Line Function
/inc/class_error.php 153 errorHandler->error
/portal.php 717 errorHandler->error_callback
Warning [2] Undefined variable $tcount - Line: 722 - File: portal.php PHP 8.1.32 (Linux)
File Line Function
/inc/class_error.php 153 errorHandler->error
/portal.php 722 errorHandler->error_callback


Welcome, Guest
You have to register before you can post on our site.

Username
  

Password


Search Forums

(Advanced Search)

Forum Statistics
» Members: 3,214
» Latest member: Warren Cobb
» Forum threads: 8,056
» Forum posts: 100,408

Full Statistics

Latest Threads
What have you done today ...
Forum: Forum chat...
Last Post: David Stepney
3 hours ago
» Replies: 6,829
» Views: 1,402,168
The essential car wash.
Forum: Forum chat...
Last Post: Tony Griffiths
6 hours ago
» Replies: 2
» Views: 79
Austin Seven max weight?
Forum: Forum chat...
Last Post: Hurvinek
Yesterday, 10:25 AM
» Replies: 24
» Views: 668
Sump bolt thread restorat...
Forum: Forum chat...
Last Post: Ruairidh Dunford
Yesterday, 10:17 AM
» Replies: 22
» Views: 575
Head / Block Leak (Possib...
Forum: Forum chat...
Last Post: AustinWood
Yesterday, 08:35 AM
» Replies: 19
» Views: 593
Wheel Balancing
Forum: Forum chat...
Last Post: Hugh Barnes
13-05-2025, 04:12 PM
» Replies: 23
» Views: 820
Getting Rear Axle back in
Forum: Forum chat...
Last Post: Howard Wright
10-05-2025, 08:13 PM
» Replies: 11
» Views: 376
Broken Spring Leaf
Forum: Forum chat...
Last Post: Robert Leigh
09-05-2025, 10:16 PM
» Replies: 5
» Views: 161
17” wheels wanted
Forum: Wants
Last Post: mhacche
09-05-2025, 05:13 PM
» Replies: 0
» Views: 62
Brake shoe crack
Forum: Forum chat...
Last Post: Peter Sweeney
09-05-2025, 01:20 PM
» Replies: 17
» Views: 562

 
  Sidelights and Type 65 & Nippies
Posted by: Stuart Joseph - 22-02-2018, 07:12 PM - Forum: Forum chat... - Replies (6)

Good evening. Was the type 65 fitted with sidelights in the headlamps and the Nippy with wing mounted sidelights? Perusal of the gallery would suggest this.

Regards from the creative county - Staffordshire

Stuart

Print this item

  Type 65 / Nippy Cylinder Head Gasket
Posted by: Colin Wilks - 22-02-2018, 05:47 PM - Forum: Forum chat... - Replies (25)

I have been told these are not being made by anybody. I'd like to get one for my 1934 Type 65. Before I start looking at getting a bespoke one made up locally here in Yorkshire, please does anyone know if they are off the shelf anywhere? 

The ones for the later h/c heads (36 onwards) are available but I think I have read on here that these are a different shape and protrude into the combustion chamber?

Many thanks for any advice.

Colin

Print this item

  Steering and ROSE joints
Posted by: Dennis Nicholas - 22-02-2018, 01:47 AM - Forum: Forum chat... - Replies (34)

First a quick plea.  When posting would everyone please use the terminology as used by Austin as found in their spare parts list.  The lists are freely available to read and download in the Austin Seven Clubs Association archive section.  This would make technical discussions so much easier to follow.  (drag link?????? what is that????.....is it the steering side tube 1A4147 or the steering cross tube 1A4018?????  and so on.   Confused

I am just about getting to the overhaul of my Nippy special, steering.
I have a dislike for the Steering side tube and its ball pins and associated springs and thrust blocks.  I believe some people have used ROSE joints in lieu of the ball pins.  To save re-inventing the wheel can someone tell me what size/material tube and rose joints that have been used (I/D and O/D of tube).  How were Rose joints fitted to tube (Male thread into tube with female thread;   insert, with female thread, welded into tube and rose screwed in?
Really full details/dimensions and how-to-do would be appreciated.

Some car details that may be relevant.
BMC A+ engine so somewhat heavier at front.  (this replaces BMC A 948 previously used)

Big 7 front axle with 1A4604 side tube leaver (some call steering arm....the arm in the stub axle that the steering side tube connects to). Apparently bigger radius means they do not crack on inside bend.


Spring shackles standard new big 7 (threaded pins rotate in threaded bush).

Morris minor cross tube leavers instead of big 7 1A4644/1A4645.  The Morris leavers were tapered and keyed into their Morris housing but have had taper turned down to parallel with keyway as per big 7.  They were also bent down slightly so that the steering cross tube was strait and clears under the chassis.  The Morris leavers take easy to get and easily replaceable ball joints.  The ball joints are standard Morris,  female end screwed onto the strait steering cross tube which i threaded with a die. I don't think I had the big 7 cross tube 1A4646 and ball ends 1A4643 at the time I did the conversion, but Morris ones are better.

The current steering side tube is a pre big 7 one cut and lengthened by a sleeve welded over.

Big 7 radius arms fixed to chassis with silent block bush (housing 1A4626 and bush 2H1051)....Does anyone know the original dimensions of the silent block bush......it would seem to be the same size as the A7 rear axle torque tube socket to chassis mounting.....but that is 2H2181 in big 7 and 2H1051 in 1937 low chassis A7........I do not know if either of the bushes on mine are the correct ones.  (who does spare 2H1051 bush? as that is what I will use if I can get a new one.
I have noted that on one radius arm end the inside surface is convex and the inner sleeve of the bush concave....I am assuming this is wear and both should be flat....note to self - must ensure bolt tightened up so no relative movement between arm and bush inner sleeve.  Perhaps there is a modern poly bush with stainless inner sleeve that purposely rotates in bush....as per those made by Super Flex for some wishbones?

Steering box is the late A7 1A6111 with worm sector 1A6125 (only 1/3 the number of teeth) and steering arm 1A6127.
Does anyone know of a source of the thrust ball bearing.......cup 1A6131 and cage 1A6124; balls (34 of) 2K5286 or a suitable replacement.  Last time I tried to find many years ago nothing was available.
Had trouble locking up on corners...embarrassing nearly going up on pavement at roundabout  Blush  Cured by use of Molyslip added to lubricant in box.

I do not have machining capabilities (or the skills) so most work would have to be outsourced.  My medium sized lathe is a bit worn and only used for non critical work.

Thanks
Dennis

Print this item

  Beaulieu camping
Posted by: AllAlloyCup - 21-02-2018, 10:08 PM - Forum: Forum chat... - Replies (2)

I’m planning some summer touring in my VW camper and hoping to take 
I’m the Beaulieu Rally. Can anyone recommend a a good campsite with 
Excellent showers etc. Perhaps there’s onsite camping as well? But maybe facilities
Are more basic? 

Any ideas would be welcome.

Regards

Bill G

Print this item

Photo Engine stand for A7 engine work
Posted by: steve davidson - 20-02-2018, 09:58 PM - Forum: Forum chat... - Replies (14)

I thought others might be interested in an engine stand we modified for Austin 7’s.  The typical commercial stand allows the engine to be rotated around the engines crankshaft but ours allows rotation in this, and the transverse direction.  I’ve put a few photos down below.

All we did was take a cheap commercial stand and replace the mounting plate with a basic frame that bolts on to the crankcase using the 4 standard connection points.  The fact that these mounting plates can rotate in relation to the frame allows us to put the engine in any configuration that suits.  The connection between the frame and the mounting points is a simple nut and bolt "friction connection" with a “wing” welded to the nut, you can see them painted yellow in the photos below.  This allows us to very quickly rotate the unit and lock it in to position. 

I'm sure others have had the same or better ideas long before ours saw the light of day.


Print this item

  Another Special Rebuild
Posted by: Adam Brown - 20-02-2018, 06:07 PM - Forum: Forum chat... - Replies (2)

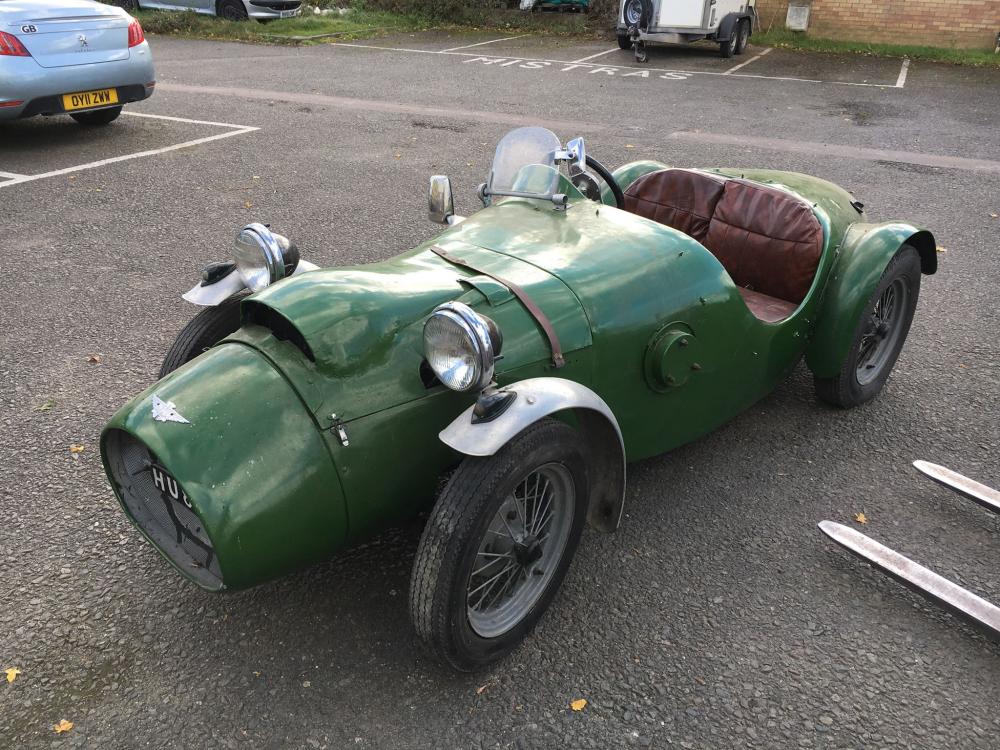
Hi everyone, there seem to be several special rebuilds/newbuilds etc on here so I thought I'd thrown mine into the mix.

I have a basic understanding of mechanics though very little experience - but hopefully I'll pick it up as things progress. I've been looking after various vintage vehicles from my families collection for a few years but dismantling and putting back together a whole car is new challenge.

The car in question was originally built in 1927 and it appears to have a Hamblin body kit on it, though I'm not 100% on that. My late grandfather purchased it a good number of years ago, used it a bit and eventually laid it up. 

I pulled it out of his garage late last year and got it running briefly before starting to take it apart. Overall it appears to be in good order, but I'd like piece of mind and it appears to be a fairly straightforward project. 

There are various things on it that are very 'special', the end of a micrometre used as one end the windscreen mounting, an old satellite dish for a grill, a shed hinge and bit of apple box for an accelerator pedal. Most instruments appear to have come from a Ford 100E, and it is in places fairly rustic. 

The plan is to go through it mechanically and fully repaint it whilst trying to retain the oddities and rough edges that make it what it is. I don't imagine special building was always the pinnacle of engineering and that a degree of bodging is part of the fun. It isn't ever going to be concours, or 'original' spec - just an honest special, most importantly it needs to be a lot of fun. 


Print this item

  Electronic ignition
Posted by: Mixer - 20-02-2018, 04:01 PM - Forum: Forum chat... - Replies (31)

Having just purchased a 38 Ruby I am thinking of changing to electronic ignition.There is nothing wrong with the original Dizzy and it starts ok,I intend to use the car on a regular basis for fun and want to cut down the possible problem areas.I admire 'purists' and their desire to keep things as is.Iam interested in sensible comments/pitfalls on the subject----any takers? Cheers. Dodgy

Print this item

  DIY hog ring pliers plus rings.
Posted by: Geoff Halstead - 20-02-2018, 02:35 PM - Forum: Forum chat... - Replies (5)

I've been following Cesar ever since I got the Singer 660A1 up and running and slowed it down to something useful from its demonic production speed.
He copied my method, his video being far more professional looking, as are all of his.
A talented man indeed.


Something else to add to my never ending To-Do list.

Geoff - Back on bl@@dy antibiotics.

Print this item

  Salvaging what you have
Posted by: Steve Bryant - 19-02-2018, 03:59 PM - Forum: Forum chat... - Replies (6)

This relates to the thread "They are still out there !" showing why some cars take longer to restore than others.....

Things are moving slow but steady on the various components of my Seven. I am pleased to say that one of the rear wings is now finished and restored, with work started on the other.

Both were severely trimmed (dare I say butchered?) to remove corrosion on the inside to the extent that there was no lip and only remnants of the rear plate and plenty of extra bolt holes for good measure.
   

I made a heavy form jig to hold everything square and made up the repair section and welded it into the wing.

.jpg   JIG 1.JPG (Size: 136.51 KB / Downloads: 545)


Once this was done I made up the back panel by forming a wired edge and spot welding it to the wing.
   

One wing down, one to go.

Cheers,
Stephen

Print this item

  First go at Special building.
Posted by: cardiffrob - 19-02-2018, 02:58 PM - Forum: Forum chat... - Replies (12)

I've started a new thread to separate this from the thread Ian Williams has for his rebuild.  Unlike Ian, I have little idea what I'm doing, and yet I work on the principle that if someone else can do something then I ought to have a go and see if I can achieve something too.

I started with a bare chassis and V5 that had lived in the loft of a shed in Pershore.  It had last seen the light of day about 40 years before and was surrounded by spares from perhaps 5 broken cars.  There was enough to build one car and the chassis was in reasonable condition.

I looked through Ebay, Youtube and Google for tips on how to build a body and bought numerous books on the subject.  I elected to use a little ash, lots of Ali sheet and some forming tools to add a skin over a steel tube frame.  the following pics hopefully will give some inspiration to anyone else trying to achieve the same result.

The engine seemed to be working with zero effort expended on fettling it.  I stuffed it onto the chassis to start jigging up a body.  A small steel frame gave me a starting point to form some structured pressed and beaten over MDF templates.  I added some Ash to give a solid mount for the door hinges and side skirts.  The rest of the bulkhead was formed from Ali sheet rivetted or bolted together.

The side skirts lowered the vehicle, cosmetically and covered the exhaust pie which then came through a hole in the skirt.  This was formed by whacking the sheet with a rounded mallet over the end of a piece of drain pipe.  Looked quite good.  The rear deck and floor are Plywood but on reflection I really should have made it from steel to add more rigidity.  Off the rear deck I hung the rear wings (£50 each) and then skinned the sides in Ali after adding a tubular steel frame.  Wraping the edges over the steel frame was a fun job (not!) and I had to add some curvature in various places to keep it looking 'right'.


Post number 2...


The doors were made in the same steel tubing and the latch assembly is just a steel rod sprung into the tube with a catch, rather like the bolt on my Lee Enfield rifle.  The removable hinges are old pulley mounts from a vintage aircraft so the doors can be removed with just 2 tugs.  The dash was routered out of Ply and then the annealed 1050 grade ali was bashed into submission.  The 120mph speedo was the correct ratio, if a little optimistic.

I still have some wiring to fix and to change the dynamo over to 12 volts once I start earning a crust again.  I lost my job on health grounds a couple of years ago and money has been a bit tight.  The front wings aren't good enough so the Mk2 version is in the pipeline, along with a new frame for the headlamps.

RP radiator since I couldn't find anything else suitable.


Attached Files Thumbnail(s)
       

.jpg   roll1.jpg (Size: 209.61 KB / Downloads: 729)
.jpg   bulkhead9.jpg (Size: 213.33 KB / Downloads: 732)
.jpg   bulkhead6a.jpg (Size: 210.63 KB / Downloads: 729)
.jpg   bulkhead9e.jpg (Size: 211.92 KB / Downloads: 728)
.jpg   roach7.jpg (Size: 196.02 KB / Downloads: 726)
.jpg   DSC00530.jpg (Size: 196.42 KB / Downloads: 723)
.jpg   7rear.jpg (Size: 339.99 KB / Downloads: 727)
.jpg   pipe1.jpg (Size: 178.04 KB / Downloads: 719)
.jpg   DSC00117.jpg (Size: 139.15 KB / Downloads: 716)
.jpg   DSC00621.jpg (Size: 410.7 KB / Downloads: 721)
.jpg   DSC00623.jpg (Size: 364.03 KB / Downloads: 715)
.jpg   DSC00576.jpg (Size: 232.34 KB / Downloads: 710)
.jpg   DSC00583.jpg (Size: 197.18 KB / Downloads: 711)
.jpg   DSC00588.jpg (Size: 147.77 KB / Downloads: 707)
Print this item