The following warnings occurred:
Warning [2] Undefined variable $search_thread - Line: 60 - File: showthread.php(1617) : eval()'d code PHP 8.1.28 (Linux)
File Line Function
/inc/class_error.php 153 errorHandler->error
/showthread.php(1617) : eval()'d code 60 errorHandler->error_callback
/showthread.php 1617 eval


Thread Rating:
  • 0 Vote(s) - 0 Average
  • 1
  • 2
  • 3
  • 4
  • 5
ARQ Ruby seat locking bar
#1
Hi all. Hope someone can help. Does anyone have any photos of the seat adjuster locking bar? These are missing off mine so the plan is to fabricate some as I don’t think they are available anymore. Have been trying to find some clear pictures on the net but no luck. I am thinking they are a flat bar with some slots cut out and a compression spring kind of assembly? Any help would be greatly appreciated.
Reply
#2
Jason I'm sorry I am not familiar with Ruby seats and not quite clear what you are looking for. 
I wonder if it is these?
   
Reply
#3
Hi Chris. 

It’s nothing like that. The photo I have is off a website. Can’t remember where I got it from but I hope it’s ok to use. This is what it sort of looks like....


Attached Files Thumbnail(s)
   
Reply
#4
By the looks of the script, I guess that's a photo of Geoff Halstead,s restoration.
Reply
#5

.jpg   seat2.jpg (Size: 60.96 KB / Downloads: 311)
.jpg   seat3.jpg (Size: 70.87 KB / Downloads: 311)
.jpg   seat4.jpg (Size: 59.47 KB / Downloads: 312)
.jpg   seat5.jpg (Size: 75.17 KB / Downloads: 313)
.jpg   seat6.jpg (Size: 76.92 KB / Downloads: 311) The photo you have posted is of the basic seat positions prior to fitting any of the sliding seat apparatus. I have attached a similar view of my ARR Ruby and also various pictures of the seat sliding frame and its construction. I would be surprised if the ARR construction is different to the ARQ.

Photo 1 is of the seat inverted with the sliding seat frame fitted looking from the front of seat
Photo 2 &3 Is a photo with seat inverted of the frame partially slid onto seat
Photo 4 Is the underside of the seat prior to fitting the sliding frame (Note the seat locking lever is fitted to this part)
Photo 5 Is the sliding frame with hinges.
Photo 6 is a photo of the seat stands which are fitted to the car body. This is essentially the same as the photo you posted but with one seat in place.

Hope the above is useful


Ian


Attached Files
.jpg   seat1.jpg (Size: 125.03 KB / Downloads: 293)
Reply
#6
Thanks Ian. That’s given me a bit to go on. I will have a look tomorrow and see how it compares.
Reply
#7
It is a chrome plated flat piece of bar with a scroll end (for a finger to pull) with a couple of slots to engage on the seat sliders. It fits into tabs welded to the seat mounting box and there is a hole mid-point to attach a spring, which connects to a tab on the seat mounting box, so that it is spring loaded, pull outwards, move the seat re-engage on the slots and it retracts locking in position, simple and effective!

Hope these photos help, it was a bit awkward without moving the car out!

These are durable parts so you should be able to find these secondhand, often turn up on eBay, or dealers that have s/h parts, or Beaulieu, which is now only a few weeks away.
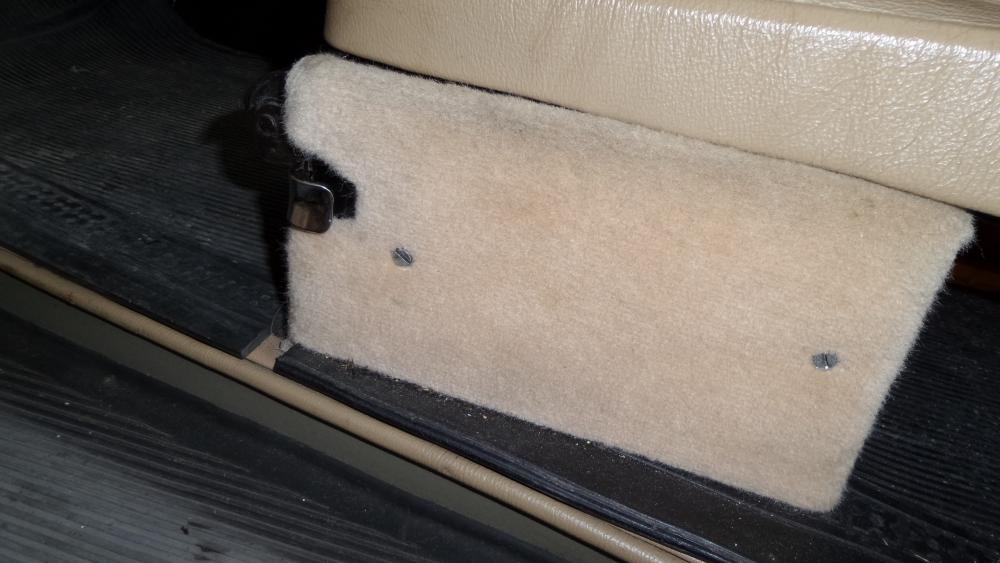
   
Passenger side
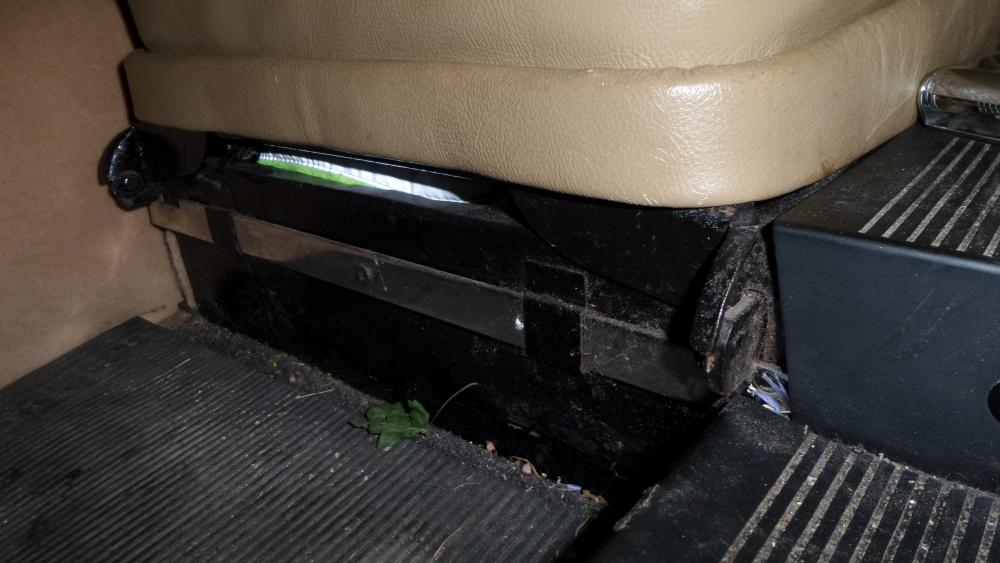
   
Driver's side
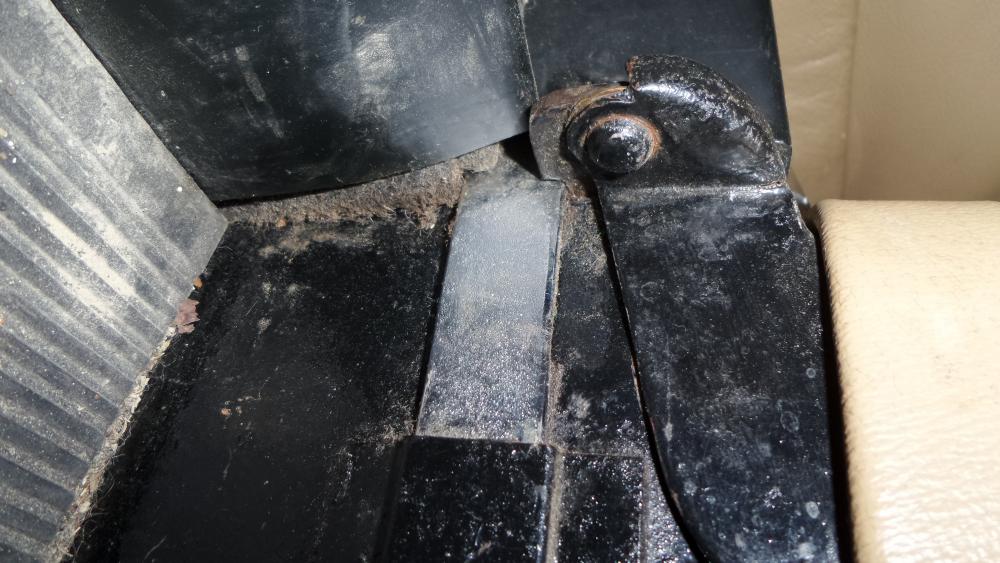
   
Passenger side by transmission tunnel (rotate anti-clockwise for correct orientation)
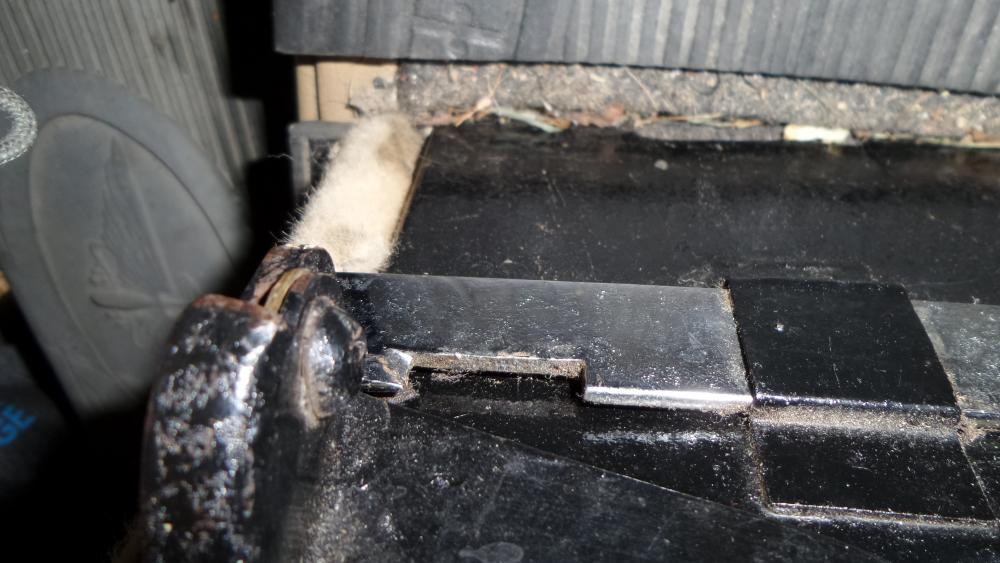
   
Passenger side nearest the door looking downwards

   
Another view of passenger side by transmission tunnel looking downwards
Reply
#8
Jason,

The photos posted by GK are absolutely nothing like my ARR Ruby.....and I think are correct for the ARQ ...So you might be best completrly ignoring everything I posted. as the ARQ fitment is clearly different than the ARR.

Ian
Reply
#9
I believe early ARQ front seats are different to later ARQ front seats. Different in the way they are hinged to tip forward, so the locking bar might be different. I can photo my early type, but is yours an early ARQ?


.jpg   seven ruby seat.jpg (Size: 82.02 KB / Downloads: 209)

Here is my locking bar. If yours is like this I can remove the bar and photo and measure for you.
Reply
#10
Thanks Gary and Andrew. That is exactly the setup. Any chance of a photo of the spring assembly? Sorry, I know I’m asking a lot. ? Looks pretty easy to fabricate and gives me an excuse to buy that nickel plating kit!
Reply


Forum Jump:


Users browsing this thread: 1 Guest(s)